Chinese Bamboo
Do you like the bamboo scene on my old Flash site? Well, here is a quick tutorial to draw bamboo with the Illustrator Symbol Sprayer and Mesh Tool.
Required: Illustrator 10+
1. Draw the Bamboo Body
Create a path like the image below with the Pen Tool and fill it with the color green. Select the Mesh Tool and click on the lower left corner of the bamboo body (pt. 1) to add a mesh point. Then change it to a lighter tone of green (yellow-green). Now add another Mesh point at the upper left corner of the bamboo(pt. 2). Add another point above pt. 2. Add a final point beside pt. 2 and select a darker green tone for the shadow.

2. Create the Bamboo Stick
Select the bamboo body you’ve created in the previous step, hold down the ALT key, drag it up to make a copy (you can use Copy & Paste if you like). Then resize the new bamboo body horizontally with the Selection Tool. Send this new bamboo body behind the first bamboo body by selecting Object > Arrage > Send Backward or press Ctrl+[. Repeat this step until you get a stack of 5 or 6 bamboo bodies.

3. Duplicate the Bamboo Stick
After you’ve finished the first bamboo, make a copy of it by ALT drag or Copy & Paste. Select the new bamboo stick, apply Filter > Distort > Twist(Angle=3) so that they don’t look identical.

4. Draw a Bended Bamboo
We want the bamboo to look natural, so we need to create some bended bamboo. Repeat Step 1 & 2 to create a bended bamboo like the image shown below. Now we 3 different forms of bamboo: straight, bended, and twisted.

5. Duplicate More Bamboo
Make more bamboo by ALT + drag. Flip and resize them around so they don’t look alike.

6. Create the Bamboo Leaves
Create the basic shape of the bamboo leaves. Use the Mesh Tool to apply a mesh gradient on it.

7. Make a Bamboo Leaves Symbol
Drag the bamboo leaves to the symbol panel to create a new Symbol. If your symbol panel is not visible, go to Window > Symbols or press Ctrl+Shift+F11.

8. Symbol Sprayer Tool
Create a new layer and lock the bamboo sticks layer(Layer 1). Select the Symbol Sprayer Tool and pick the bamboo leaves Symbol. Spray it on Layer 2 by dragging the mouse.

9. Symbol Sizer Tool
To create various sizes of bamboo leaves: use the Symbol Sizer Tool and randomly click on the bamboo leaves object. Tips: hold down ALT key+click to reduce size.

10. Symbol Spinner Tool
Use the Symbol Spinner Tool to rotate/spin Symbols.

11. Symbol Shifter Tool
Use the Symbol Shifter Tool to spread out the bamboo leaves by dragging your mouse around.

12. Symbol Stainer Tool
Select a lighter green color and use the Symbol Stainer Tool to tint the symbols.

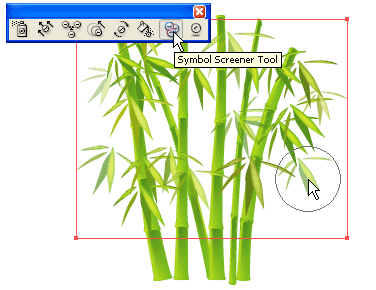
13. Symbol Screener Tool
Use the Symbol Screener Tool to reduce the opacity of the bamboo leaves. This will result in a transparent effect.
14. Make More Leaves Behind
After you done with the leaves on Layer 2, make a new layer(Layer 3) behind the bamboo stick layer. Lock Layer 1 and Layer 2, use the Symbol Sprayer Tool to create more bamboo leaves(refer to Step 8-13).

15. Add More Bamboo Sticks
Duplicate more bamboo sticks. Resize and send them behind the big bamboo sticks.

Final
Here is the final image.


